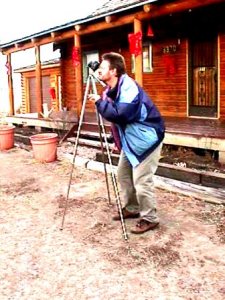
The Equipment

All you need is a tripod, a manual SLR camera and a cable release.
Astrophotography
| Taking high-quality pictures of planets, galaxies, planetary nebulae etc. is an art. But one branch of astrophotography is actually very easy. As you browse through my web pages, you notice many home made photos of constellations, of the movement of planets, of the aurora. Given just three pieces of equipment, this type of photography is ideal for the beginner. |
The Equipment
All you need is a tripod, a manual SLR camera and a cable release.
 |
The SLR camera should be as manual as possible and have one
important feature: a B setting for "bulb" (time exposure). Stars
appear as faint objects and to overcome this, you need to keep the shutter
open for about 20 seconds (on average).
Any manual SLR camera will work (Olympus, Nikon, Canon, etc.). I use a Minolta and a Pentax P30n. A very popular one is the Pentax K1000. Unfortunately, stores sell mostly automatic cameras which have no bulb setting and use batteries (the latter is bad because the batteries shut down in the cold). But some stores are selling used manual cameras and the online auction house Ebay is a very good and reliable source. |
 |
Since the exposure lasts about 20 seconds, the camera needs to be stable, thus the need for a tripod. |
 |
 |
How to operate the camera


An SLR camera may look rather complicated. But for astrophotography
there are three easy settings: (1) the B setting (bulb, time exposure)
as mentioned before, (2) leave the shutter wide open, i.e. choose
the smallest number on that scale (1.4, 1.7, 2.0, whichever is the smallest),
and (3) since stars are very far, focus at infinityµ
The lenses
 ...
...  |
 ...
...  |
As a rule of thumb, divide 1000 by the focal length: for the wide angle 1000 / 28 = about 40 seconds; for the normal lens 1000 / 50 = 20 seconds; for the zoom 1000 / 200 = 5 seconds.
You
notice the disadvantage of the zoom lens right away: at 5 seconds (no star
trails), you get very little light and thus faint stars or even an underexposed
picture (making the sky background an ugly brown).
Let's
discuss the exposure times for the 50 mm lens: the maximum time before
star trails is roughly 20 seconds. Make a shot for 100 seconds
and you will definitily get star trails. Now, the closer the stars
are to the North Star (Polaris), the longer you may actually expose.
That's because the stars near Polaris are "moving" less. A picture
of the Little Dipper can last about 60 seconds without having star trails.
Film

Film has different "speeds". Here you see ASA 100, 400, 800.
In photography, we have to make a compromise when we use one film or the
other. The slower the speed (smaller number), the smaller the grains
on the emulsion, meaning very sharp images. That's why most films
are ASA 100 and 200. But they need a lot of light, thus you need
to be outdoors during a sunny day or use a flash. For astrophotography,
we need fast films (large number). (Indoor sports photographers use
fast films as well because of less light [despite lamps and flash].)
Fast film means that they get an image with less light, thus shorter exposure
times are possible for faster action. However, they are grainier,
meaning that they are not as sharp. Nevertheless, their quality is
certainly good enough for what we want to do. I used ASA 1000 when
I started, but now routinely use ASA 400.
I recommend starting with rolls of 12 images. That way, you know
very quickly if you do it right and what you like to improve (don't feel
foolish when you get bad photos; professional photographers readily admit
that they did every mistake that possibly could be made). As with
any kind of photography, expect to use lots of film and expect that among
the many pictures, you will have a few that you really like.
Some photos
Usually you want to expose to the maximum since you want to gather as much light as possible.
PHOTOS
Here are exceptions:
 ...
... 
The Scorpion on the left was shot by accident (the cable release wasn't
locked correctly, so the shutter closed after 2 seconds). However,
that way only the brightest stars appeared, outlining the familiar form
of this constellation. The Scorpion is a perfect example since it's
prime stars are rather bright.

This picture is of Cassiopeia. It's in the form of a W (tilt
your head a little to the left, then look just right of the center).
The shot was a typical 40 seconds with a 50 mm lens (since it's close to
Polaris, exposure time can be longer than the typically recommended 20
seconds). It's a pretty picture. It has one drawback if you
just want to see the W: due to Milky Way running right through Cassiopeia,
too many stars appear. If you just want the W without the Milky Way,
expose for about 10 seconds.
PICTURE OF STAR TRAILS.
Once in a while you want to take star trails. Depending on how long the trails should be, expose anywhere between 2 minutes and a couple of hours.
PICTURE OF FLASHING AIRPLANE.
Taking a picture of an airplane flashing through a constellation adds to appeal. You could also catch a satellite on film.

When photographing the aurora I use a 28 mm lens to cover more area
in the sky. The maximum exposure time without star trails would be
40 seconds, but it's photographing towards North, thus the exposure time
lengthens to about 60 to 80 seconds. And, since I like to get as
much detail and color in as possible, I recommmend taking photos anywhere
between 1 and 3 minutes (and yes, then you will get star trails).
PICTURE OF COMET


Can we use a flash for astrophotography? Of course not. A flash is used, so that its light is reflected off an object and then enters the camera lens. Moon, Sun, planets, stars, etc., are too far to reflect a flash's light. Plus they either emit their own light (Sun, stars, galaxies) or already reflect light (planets, Moon, comets).
That stars have spokes is actually not true.
As far as observations with the naked eye, binoculars or a telescope are concerned: the human eye is not a perfect optical instrument, so it does spread out the light from a bright star into many spokes. Especially people with bad eyesight can notice that when they look at bright street lights without their glasses or contacts.
This is what happens on photos:


Both pictures were taken with the HST (showing parts of the Orion Nebula
and of the globular cluster M33). Notice that the bright (over-exposed!)
stars exhibit four major diagonal spokes and four fainter ones in between:
HST's mirror needs to be mounted and apparently it has four major and four
minor stress points/lines due to mounting, and these "warp" the mirror
enough so that these stress points show up as star spokes on long exposures.
PS the purplish stars in the Orion shot also exhibit Airy disks.
These are explained in my Hubble lecture.